Category: Cakes, Cookies & Desserts

  • The Cookie & Milk Cup

    The Cookie & Milk Cup

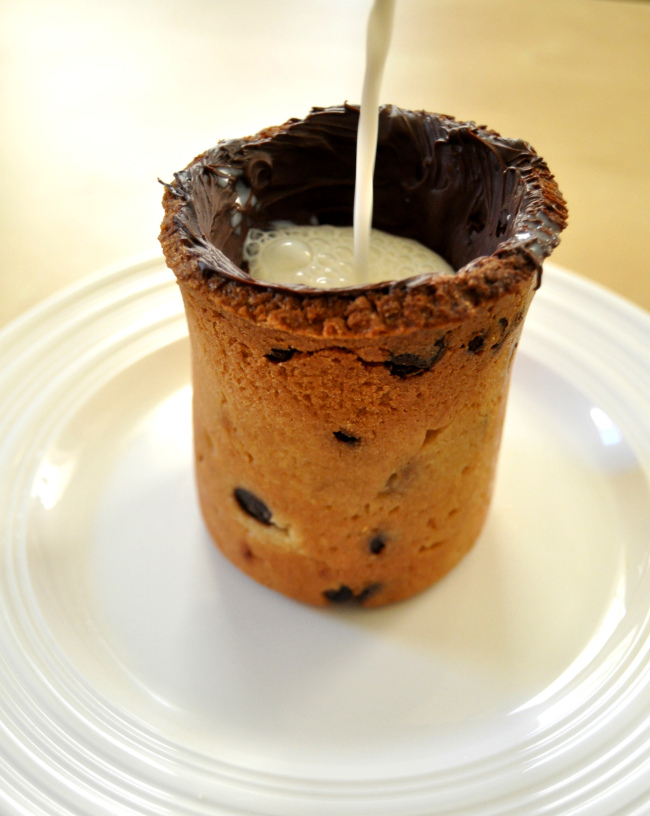
    This weekend was an eventful one — we celebrated our friend’s visit to Baltimore on Thursday night with some great food, went out to dinner at Papi’s Taco Joint on Friday night, visited the Boordy Vineyards on Saturday afternoon, cooked a homestyle Arabic dinner, and made “The Cookie-and-Milk Cup” on Sunday afternoon. This cookie cup is inspired by the Cookie Shots — a brilliant invention of Chef Dominique Ansel, who is also the creator of the world famous Cronut. Hailing from France, Chef Ansel was alien to the common concept of dipping warm cookies in cold milk and so his genius mind thought “why not combine the two?” To hold the milk without leakage, he coats the inside of his cookie shots with a heat-resistant chocolate glaze so that he can warm the cookie shots (without melting the glaze) before pouring in the cold milk and serving. He fills his cookie shots with ice cold milk touched with vanilla and sugar, which makes them even more special.

    Image

    On my last visit to NYC, we were so close to visiting the Dominique Ansel Bakery in SoHo for some Cookie Milk Shots, until we found out they were closed that week due to a severe mice infestation. Those cookie shots had been on our minds since then and so the family finally got me to make them. I did not have oven-safe shot glasses so I used stoneware teacups and made cookie cups instead of cookie shots. The amount of dough that went in one cup was equal to almost 4-5 regular sized cookies. So the cookie cups were obviously pretty heavy. I coated the insides of the cups with melted dark chocolate to make them sturdy enough to hold a good amount of milk. And lastly, I got the vanilla bean infused milk ready to get poured into the cookie cups. We thought that the vanilla milk was the star of the cookie cups. It was cold, barely sweet and super refreshing.

    This cookie cup was definitely fun to make. But watching others trying hard to eat it in a dignified manner was much more fun! Make it at home and you will not have anyone judge you by your chocolate smeared face! 😉

    Image

    The Cookie & Milk Cup

    Partially adapted from Byron Talbott

    For the cookie cup:
    2 cups – plain flour

    1/2 tsp – salt
    1/2 cup – unsalted butter, softened
    1/2 cup – granulated sugar
    1/2 – brown sugar
    1 – egg
    1/2 cup – semi-sweet chocolate chips
    1/2 cup – dark chocolate for the coating

    For the vanilla bean infused milk:
    1 cup – cold milk
    1 inch piece – vanilla bean, split & scraped (or use 1/8 tsp of vanilla bean paste)
    1/4 tsp – sugar

    1) Whisk the butter and sugars for 3-5 minutes till smooth and creamy. Add in the egg and whisk till incorporated.
    2) Add in the salt and flour, a third at a time and mix just till incorporated. Mix in the chocolate chips.
    3) Cover and refrigerate the dough for 30 minutes. In the mean time, brush the insides of 6 oven-safe teacups with oil or melted butter. Alternatively, you can use a popover pan to make these cups.
    4) Make the vanilla milk by combining all the ingredients and refrigerate till it’s ready to use.
    5) Lightly flour your hands. Divide the chilled dough among the greased cups and press it firmly and evenly on the base and sides of the cup, making sure there are no holes/cracks/air pockets. Also make sure the cups have a decent thickness. They will break if they are too thin. Smooth the insides using a straight rolling pin or a similar shaped object.
    6) Place a piece of foil big enough to cover all the dough inside the cup. Then fill the cup with pie weights or any uncooked beans like black beans, kidney beans or garbanzo beans. If you skip this step, your cookie cups will not remain hollow. They will rise and there will be no room to pour the milk.
    7) Place the cups on a baking sheet and bake them for 15 minutes in an oven preheated to 375°F. Take the cups out and carefully pull out the foil with beans in it. Place them back into the oven for another 5-8 minutes or until the cookie cups have brown edges. Let them cool for 30 minutes.
    8) Gently invert the cups and the cookie cup should easily slide out. Melt the dark chocolate in a double boiler or microwave and brush it on the insides of the cookie cups, paying special attention to any cracks that developed during the baking process. This will make the cups sturdy enough to hold the milk well. Refrigerate the cookie cups for 20 minutes or till the chocolate coating hardens. 

    9) When ready to eat, pour in the vanilla milk.
    10) Take a sip of milk, take a bite of the cookie, take a sip, take a bit, take a sip, take a bite, share and enjoy!


  • Blackberry White Chocolate Macarons

    Blackberry White Chocolate Macarons

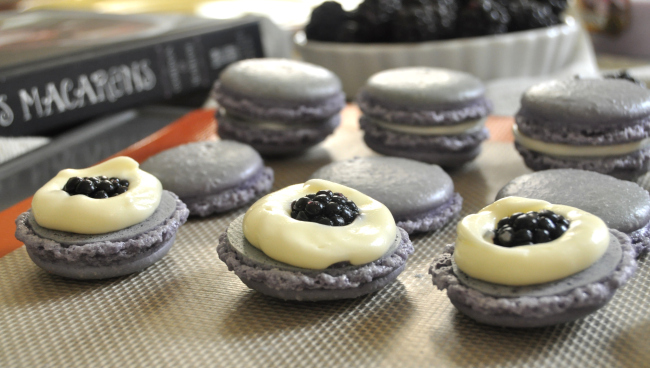
    I never liked how macarons tasted, but I loved how they looked — pretty pastel colored cookies with frilly centers, almost like they just walked out of a dollhouse. A couple of weeks ago, I tried making French macarons for the first time following Chef Pierre Herme’s world famous macaron recipe (Italian meringue method). I ground almonds to make my own almond flour and made the batter following the recipe to the gram. I had hopes of seeing perfect (smooth shiny tops, frilly feet and what not) macarons slide out of the oven. But I failed. As disappointed as I was, I had to convince myself that I got tricked by this 3-ingrdient recipe which looked so straightforward but was really not.

    After this first attempt, I did decide never to waste anymore almond flour in making macarons. Soon after, we were toured around New York City by an awesome food enthusiast and on his suggestion, my sister and I visited Chef Thomas Keller’s Bouchon Bakery and tried their macarons. We got a box of six — raspberry white chocolate, mango-coconut, vanilla, chocolate and pistachio. These macarons were very promising — they tasted less of sugar and more of the flavor name tags beside them. Now I haven’t tried the Ladurée macarons and so I don’t know how good they are but I can assure you that the Bouchon Bakery macarons are probably better than the best.

    Every time we taste an amazing baked good, my job is to come home, do some research, make it, (try to) meet the standards and perfect it. That being said, I was tempted to make macarons again, but this time, I had to meet the Bouchon standards!

    This time I used store bought almond flour and used the French meringue method. I learned that making macarons was less about ingredients and a lot more about technique. Getting the meringue right is key and so is the batter consistency. After that comes recognizing the right oven temperature as all ovens differ. I still need to work on finding the suitable temperature.

    Image

    Image

    Blackberry White Chocolate Macarons

    Partially adapted from Byron Talbott

    For the the macaron shells:
    65g (2/3 cup) — powdered sugar
    50g (1/2 cup) — almond flour
    1 — egg white
    20g (2 tbsp) — granulated sugar
    1 to 2 drops — purple gel food coloring (optional)

    For the White Chocolate Buttercream
    3 tablespoons — butter
    1/4 cup — powdered sugar
    3 tablespoons — melted white chocolate

    For the Macerated blackberries:
    10 to15 — blackberries
    1 tablespoon — granulated sugar

    1) In a medium bowl add the egg white and begin whisking until foamy. Add the granulated sugar and continue whisking until the meringue has semi-soft peaks. Add the food coloring half way through the process. Be careful not to over mix or you will have to start over.
    2) Sift the almond flour and powdered sugar in a separate bowl and begin to fold the meringue into the dry ingredients a half at a time. Once the batter is finished it should look like a thick cake batter. Drop a little of the batter back into the bowl and if it absorbs into the rest of the batter within 15 seconds it’s finished.
    3) Scoop the batter into a piping bag fitted with a small round metal tip and pipe out the macarons slightly larger than the “Thin Mint” wafers. Tap the tray to make sure there isn’t any air trapped inside the batter and allow to dry for 15-20 minutes. Once dry bake in a 300°F oven for 12-15 minutes.Take the macarons out of the oven and allow to cool for 30 minutes before removing them from the tray.
    4) While the macarons are cooling, make the buttercream filling. In a medium sized mixing bowl add the room temperature butter and powdered sugar and begin to whisk until all of the powdered sugar is absorbed into the butter. Add the melted white chocolate and begin to whisk until the buttercream is smooth. Scoop into a piping bag and reserve until ready to use.
    5) Slice some blackberries in half and add to a small bowl. Add some sugar to the blackberries and gently mix until the sugar has dissolved onto the blackberries.
    6) Pipe a quarter sized dollop of buttercream on the flat side of a macaron then place one of the halved macerated blackberries in the center and gently press down until the buttercream spreads close to the edge of the macaron. Top with the other macaron cookie and enjoy!

    Store the cookies in an airtight container.
    Makes 1 dozen.


  • Triple Chocolate Mousse Cake

    Image

    For the cake layer:
    Dry ingredients:
    1 1/2 cups – plain flour
    1 cup – sugar
    3 tbsp – unsweetened cocoa powder
    1 tsp – baking soda
    1/2 tsp – salt

    Wet ingredients:
    6 tbsps – oil
    1 tbsp – white vinegar
    1 tsp – vanilla extract
    1 cup – ice cold water

    1) Mix all the ingredients very well with a whisk.
    2) Pour all the liquids into the dry flour mixture and mix well with a whisk until the batter is smooth. Do not over beat.
    3) Pour the batter in a 9″ cake pan with a loose bottom or a spring form pan. Bake the cake for about 20 – 25 minutes or until the top is springy when touched. When it’s done, take it out and cool completely.
    4) Once the cake is cool, brush it with some brandy or amaretto (optional). 

    For the dark chocolate mousse:
    150 gms – mini marshmallows
    50 gms (1/2 stick) – unsalted butter 
    250 gms – dark chocolate (at least 60% cacao), chopped
    1/4 cup – boiling hot water
    250 ml – heavy cream
    1 tsp – pure vanilla extract

    1) Place all the ingredients except heavy cream and vanilla in a non-stick saucepan and stir together on med-low heat until it’s all smooth and melted. Take off from the heat and let it cool.
    2) While the chocolate mixture is cooling, whip the cream and vanilla until soft peaks form (not stiff).
    3) Gently fold in the cooled chocolate mixture until it’s all mixed. Pour this mousse on the cake layer and chill it in the fridge until it’s well set.

    For the white chocolate glaze:
    1/2 cup – white chocolate, chopped
    2 tbsp – heavy cream
    1/2 cup – sour cream

    1) Heat the heavy cream till it’s hot but not boiling.
    2) Pour it over the chopped chocolate and let it sit undisturbed for 2 minutes. Then stir it up till all the chocolate melts. Let it cool to room temperature. Then whisk in the sour cream and pour the glaze over the dark chocolate mousse layer. Refrigerate till set.
    3) Decorate with berries of your choice and serve.

  • Raspberry & White Chocolate Tart

    Image

    White chocolate and raspberry is my favorite dessert combination in the world. I love how the sweetness of matte white chocolate and sourness of bright juicy raspberries complement each other. And, needless to mention how pretty they look together!
    DC vs. Baltimore food truck Saturday..out of the 50 trucks there, I had my eyes stuck this one truck that sold white chocolate raspberry cheesecake on a popstick.

    DC vs. Baltimore food truck Saturday..out of the 50 trucks there, I had my eyes stuck on this one truck that sold white chocolate raspberry cheesecake on a popstick.

    A few months back, we had a friend visiting from the Midwest. So I made Paneer Pesto Wraps for dinner and tarts for dessert. I filled some of the tarts with the classic PBJ and some with pastry cream and strawberries. Then I had some leftover tart shells (they keep well for a good month) with which I made these Raspberry & White Chocolate Tarts.

    The usual tart pastry recipes call for rubbing cold cubes of butter into the flour, forming the dough with egg or water and refrigerating the dough before baking. But this tart shell recipe is the complete opposite — uses melted butter, doesn’t use any egg and no refrigeration required. And good news is that it’s a guaranteed fail-proof recipe so do give it a try.

    Image

    For the tart pastry:
    90g – unsalted butter
    3 tbsp – water
    1 tbsp – vegetable oil
    1 tbsp – sugar
    Pinch – salt
    1 cup – flour

    1) To make the tart pastry, preheat the oven to 200 C (400 F).
    2) Place the butter, water, oil, sugar and salt in an overproof bowl.
    3) Put the bowl in the oven for about 15 minutes, until the butter is melted, bubbling, and just beginning to brown around the edges. This step can even be done by placing a saucepan on a stovetop on low heat.
    4) Carefully remove the bowl from the oven and dump in the flour. Stir quickly, until the dough comes together and pulls away from the side of the dish.
    5) Put the dough into the base of one 10″ tart pan or divide it equally into six 3″ tart pans.
    6) Press the dough around the base of the pan with a spatula, and then once it is cool enough to handle, use your hands to evenly press it into the base and up the sides of the tart tin.
    7) Prick the dough all over with a fork and place the tart pan(s) on a baking tray.
    8) Bake for 12-15 minutes, or until the pastry is golden brown all over. Remove the pans from the oven and cool completely before filling.

    For the white chocolate filling:
    3/4 cup – heavy cream
    2/3 cup – whole milk
    1 tsp – pure vanilla extract
    6 oz – white chocolate, chopped

    For the topping:
    1 cup – fresh raspberries
    Confectioner’s sugar for dusting

    1) Whip the heavy cream till soft peaks form. Refrigerate.
    2) Bring the milk and vanilla to a simmer. Pour it over the white chocolate and let it sit undisturbed for 2 minutes. The hot milk will help melt the chocolate. After 2 minutes, give it a good stir until it’s smooth. Cool this mixture to room temperature.
    3) Gently fold in the whipped cream into the white chocolate mixture.
    4) Pour this filling into the tart shell(s) and refrigerate for about an hour or till the filling is set.
    5) Arrange the fresh raspberries on top.
    6) Dust the confectioner’s sugar on those gorgeous red rubies!

  • Skinny Chocolate Carrot Cake

    921725_10151638400472363_2115575013_o

    My sister is a chocolate cake monster. I make a chocolate cake ever so often and every time I make it, she refuses to share. She finishes the entire cake herself in less than a day. And it pains to think about how ridiculously unhealthy it must be for her gut.

    So this time, for her endless chocolate cake cravings, I decided to take the “skinny” (healthy) way out, without compromising on taste. A few days back, I mentally created a chocolate cake recipe with whole wheat flour, oil and carrots. This weekend, I set that mental creation to action. Result — a super moist chocolate cake with the hidden goodness of carrots, and whole wheat flour of course. Next time, I plan to replace some of the wheat flour with ground oats, the oil with applesauce, and the sugar with agave nectar. I’m certain to make this “skinny” cake again. You should too! 🙂

    475119_10151638400352363_765866697_o

    Dry Ingredients:
    1 1/2 cups – whole wheat flour
    3 tbsp – unsweetened cocoa powder
    1 tsp – baking soda
    1/2 tsp – salt
    1 cup – caster sugar

    Wet Ingredients:
    1/3 cup – oil
    1 tbsp – white vinegar
    1 tsp – pure vanilla extract
    1 cup – diet coke

    3 medium – carrots, finely shredded
    Confectioner’s sugar for dusting

    1) Sift all the dry ingredients.
    2) Mix together all the wet ingredients.
    3) Pour the wet into the dry and mix until combined well.
    4) Fold in the shredded carrots.
    5) Pour into a greased 8″ baking pan and bake for 25-30 minutes in an oven preheated to 180 C/350 F.
    6) Cool completely, dust with the confectioner’s sugar and slice.


  • Tea Time Vanilla Cake

    Image

    I love vanilla cake over any other type of cake. Love it to the extent that I once asked my sister to get me three loaves of plain vanilla pound cake as my birthday present. A perfect vanilla cake is one that is slightly dense in texture, buttery in taste and has an evenly browned crust.

    I’ve made numerous attempts at making the “perfect vanilla cake” in the past which have yielded both failures and successes. However, the one I made last weekend was the best one I’ve ever made. I would like to call this a pound cake but am a little hesitant because real pound cakes are made of butter and this recipe uses oil. Although the cake didn’t taste buttery, it was still moist and perfectly dense. The original recipe called for 1 cup of oil (to 1 cup of flour) which I thought was too much. So I tweaked the recipe a bit by adding only 1/2 cup oil and replacing the other half with buttermilk, hence making it less fattening.
    303430_10151635844357363_1834889470_n
    1 cup – plain flour
    1 tbsp – cornstarch
    1 cup – caster sugar
    1/2 tsp – salt
    1 tsp – baking powder
    4 – eggs
    1/2 cup – oil
    1 tbsp – pure vanilla extract
    1/2 cup – buttermilk

    1) Preheat the oven to 180 C/350 F.
    2) Sift the plain flour, cornstarch, sugar, baking powder, and salt.
    3) Break the eggs in a blender along with the oil and vanilla. Blitz for 1 minute.
    4) Pour the egg-oil mixture into a bowl and gently fold in the flour mixture alternating with the buttermilk.
    5) Pour the batter into a generously greased 7″ baking pan.
    6) Bake for 25-30 minutes or until a toothpick inserted in the center of the cake comes out clean. Cool completely before slicing.

  • Chocolate Chunk, Rosemary & Olive Oil Muffins

    ImageWintry Baltimore is finally starting to get warm and this weekend my mum and I are going to New Jersey to visit friends from Abu Dhabi. I love to bake, they love to eat and we love how perfectly this always works out! 🙂

    As per usual, I was having trouble figuring out what to make. I knew I had a feel for making muffins as they would be easy to pack and take, but didn’t know what kind. A few days back, I came across this recipe for a chocolate chip rosemary cake and I had had that on my mind since then. The combination sounded way too interesting (and maybe a little weird?)

    The recipe of this cake batter rightly resembled a muffin batter recipe and so I thought of making chocolate chip rosemary muffins. Although this recipe had great reviews, I was still anxious about the combination of flavors. Yet, nothing stopped me from giving this a try.

    I made the muffins, took them out of the pan and stared at them for minutes. They looked scrumptious. Regardless of how pretty they looked, I was afraid to taste them. But my sister and mum taste-tested them with quite a lot of incitement. They loved the flavors and went ahead to take a second bite. My mum said her favorite part about the muffin was the crunchy top.

    I made two batches of these muffins — in the first one, we felt that the rosemary sharply overpowered the bitterly sweetness of the chocolate and so I decided to reduce the amount in the second batch. Apart from that, these muffins were perfectly dense in texture with tender crumbs, chunks of dark chocolate, peppery rosemary and fruity olive oil all held together.

    Chocolate Chunk, Rosemary & Olive Oil Muffins
    adapted from Oeufs Mayonnaise who got the recipe from 101 Cookbooks

    Image

    Olive oil for the pan

    Dry ingredients:
    3/4 cup – spelt flour (can use ground oats instead)
    1 1/2 cups – plain flour
    3/4 cup – sugar
    1 1/2 tsp – baking powder
    3/4 tsp – kosher salt

    Wet ingredients:
    3 eggs
    1 cup – olive oil
    3/4 cup – whole milk

    1 1/2 tbsp – fresh rosemary, finely chopped (I used 1 tbsp)
    5 oz – bittersweet chocolate (70% cacao), chopped
    2 tablespoons sugar for top crunch

    1) Preheat the oven to 350F. Lightly grease a muffin pan with olive oil.
    2) Sift the dry ingredients into a large bowl, pouring any bits of grain or other ingredients left in the sifter back into the bowl. Set aside.
    3) In another bowl, whisk the eggs thoroughly. Add the olive oil, milk and rosemary and whisk again. Using a spatula, fold the wet ingredients into the dry, gently mixing just until combined. Stir in 2/3 of the chocolate. Divide the batter evenly among the muffin cups, smoothing the top. Sprinkle with the remaining chocolate and 2 tbsp of sugar on the top.
    4) Bake for about 20 to 25 minutes, or until the top is domed, golden brown, and a skewer inserted into the center comes out clean.
    5) Serve warm or cold.

  • Melt-in-the-mouth Cookies

    Image

    My cousin recently got engaged and we are visiting her in-laws (to-be) in North Carolina this weekend. The last time she visited, her mom-in-law gifted her a cookie press and asked her to make some cookies using it and send her pictures. Well, that never happened, and being the biggest baking freak, I couldn’t resist using her cookie press. So I decided to make my favorite butter cookies and take with us to NC.

    I love this recipe because it uses very few ingredients, there is no hassle of using any machine, they are just mildly sweet and so buttery that they magically melt in your mouth. Since I was in the mood for making something cutesy looking, I made little flower shaped cookies with 100’s & 1000’s.

    Image

    3/4 cup – plain flour
    1/4 cup – cornstarch
    1/4 cup – confectioner’s sugar
    1/2 cup (1 stick) – unsalted butter (softened but not melted)
    1/2 tsp – pure vanilla extract
    1/4 tsp – salt

    1) Combine the flour, cornstarch and salt together.
    2) In a separate bowl, whisk the butter, sugar and vanilla using a wooden spoon until it’s smooth.
    3) Add in the flour mixture and combine. You’ll have a soft dough ready.
    4) Spoon this dough into your cookie press and press out the cookies on an ungreased and unlined baking sheet. If you’re not using a cookie press, simply roll the dough into small balls and flatten them slightly. Place on an ungreased baking sheet and proceed.
    5) Decorate with cherries, chocolate chips or anything of your choice and bake for 12 – 15 minutes in an oven preheated to 350F/180C. The cookies are done when the edges turn slightly brown.
    6) Remove from the oven and allow cookies to stand for 3-5 minutes and then transfer to wire rack to cool completely.


  • Thai Chai Crème Brûlée

    483782_10151571255742363_625499759_nOnce again today, like any other random day, I was in a high spirit for making a dessert that I had never attempted before. While I was driving to the grocery store, my mind deliberately activated its thought process, trying to figure out what to make. I felt as if several desserts were running a marathon, hastily working towards hitting their finish point — my mind.

    As I was cruising my cart through the aisles, I unintentionally passed by the tea and coffee aisle. That suddenly reminded me of the giant jar I had in my kitchen that was filled with Thai tea leaves. I reminisced how my sister went to every Asian store that possibly existed, just in search for Thai tea leaves and came back dismally failed. Her endless Thai iced tea cravings finally got her to order a massive bag of Thai tea leaves online and hence the jar full of it.

    My sister loves crème brûlée and so do I. But the only one I’ve had in the past is a plain vanilla one with raspberries and a pistachio crème brûlée with a chocolate ganache and pistachio brittle (best ever). As much as we love crème brûlée, we also love Thai iced tea. So today, I thought of combining the two favorites resulting in a Thai Chai Crème Brûlée.

    It’s rich and creamy and has a bright orange finish, almost like that of a Halloween pumpkin!

    Pistachio Crème Brûlée at Marie Louise Bistro
    Pistachio Crème Brûlée at Marie Louise Bistro

    Thai Chai Crème Brûlée
    adapted from myself

    Image

    Image1/2 pint – heavy whipping cream
    1/4 cup – sugar
    2 tsp – Thai tea leaves
    2 – egg yolks
    1/2 tsp – vanilla

    1) In a saucepan, heat together the cream, sugar and tea leaves. Heat the mixture until bubbles appear around the edge. Turn off the heat and strain the mixture. (I used a cheesecloth to strain  it to avoid any fine leaves.)
    2) Lightly whisk the egg yolks and vanilla. Slowly add in a couple spoons of the warm cream mixture while still whisking continuously in order to temper the eggs.
    3) Pour the tempered egg mix back into the warm cream and mix well.
    4) Ladle the custard into 4 ramekins placed in a fairly deep baking dish. Slowly and carefully pour hot water into the pan till it comes halfway up the sides of the ramekins.
    5) Bake them in a preheated oven (350 degree F) for about 15 minutes or until the custards are just set but still wobbly in the center. Let them cool completely in the water. Refrigerate for at least 3 hours.
    6) Right before serving, sprinkle about 1 teaspoon of sugar evenly on the top of each custard and “brûlée” (burn the sugar) the tops using a torch to form a crispy, golden layer. If you don’t have a torch, you can heat up the top broiler in your oven to the highest temperature possible. Move the top rack in your oven up as high as it can go. Place the ramekins in the oven on the top rack, and broil for 3 – 5 minutes, rotating them frequently so that they broil evenly. Take them out when they are golden brown and bubbling. Allow the crème brûlées to sit for at least 5 minutes before serving. I like them cold, so I put mine back into the refrigerator for no longer than 30 minutes, else the crunchy sugar layer will begin to soften.

  • Lime Basil Panna Cotta

    Image

    I was in the mood for making a dessert on a random evening last month. But I wanted to make something I had never made before. I had a bazillion desserts running through my mind but the evening was short and I had to figure out what to make. As I sat down trying to ease up my dilemma, I suddenly recalled this Mango & Coconut Panna Cotta that I had ordered at a restaurant couple years ago. However, I acutely remember the flavors of the dessert weren’t pungent enough and I didn’t enjoy it much. Point being, I came to a conclusion of making a panna cotta, but a different flavored one. I desired something refreshing and so lime was the way to go. For a while, I had been wanting to make a lime and rosemary flavored dessert. So I thought of making a lime and rosemary panna cotta.

    As soon as I made up my mind, my sister Shivani, came frenziedly hopping into my room asking me what I was going to make. When I told her, she firmly disapproved of my idea of flavors. She suggested I make a lime and basil panna cotta instead of lime and rosemary. For once, I became partially reluctant and serenely agreed with her idea.

    Lime & Basil Panna Cotta
    adapted from my sister and myself

    Image

    Image

    1 pint – heavy whipping cream
    1/4 cup – caster sugar
    juice and zest of 2 limes
    1 handful – fresh basil leaves, torn
    2 1/4 tsp – powdered gelatin
    2 tbsp – cold water
    Strawberry coulis to serve (recipe follows)

    Image

    1) Place the sugar, lime juice, lime zest and torn basil leaves in a saucepan.

    Image

    2) Rub it together using the back of a spoon so that the sugar gets infused with the lime and basil flavors.
    3) Then add in the cream and mix. Let it sit for 20 minutes.
    4) Meanwhile, soak the gelatin in the water for 10 minutes.
    5) Heat the cream mixture on medium heat until bubbles appear around the edge. Do not bring to a boil.
    6) Turn off the heat and add in the soaked gelatin. Stir until the gelatin dissolves.
    7) Strain the mixture and pour it into 4 lightly greased custard cups.
    8) Let them cool to room temperature and then set the cups in the refrigerator for at least 4 hours or until completely set.
    9) To serve, run a sharp knife around the edge of each panna cotta and unmould onto a serving plate. Garnish and serve.

    Strawberry Coulis
    adapted from Laura Vitale

    1 cup – frozen but thawed strawberries
    1 tbsp – sugar (more or less depending on your taste)
    1 tsp – fresh lemon juice
    1/2 tsp – cornstarch mixed with 1 tbsp water

    1) Place the strawberries, sugar and lemon juice in a blender and puree it. Strain it through a fine sieve and place the puree in a small saucepan.
    2) Bring the puree to a simmer and add the cornstarch mixture and cook stirring constantly until the mixture thickens. Remove from the heat and pour it in a small container and let it cool completely.